Showing posts with label Purchasing. Show all posts

Purchasing - Quote Analysis


@  Quote Analysis


Use the Analyze Quotations window to review and approve general or specific
quotation information for an item or a purchasing category. You need to approve quotation shipments if you want requestors or buyers to be able to reference the shipments on purchase orders or requisitions. Purchasing lets you approve quotation shipments for specific purposes so that you can control the use of your sourcing information.

To approve quotation shipments:

1. Navigate to the Analyze Quotations window by selecting the Find button in the
Find Quotations window. Purchasing opens the Analyze Quotations window and
displays in the Quotations tabbed region all shipment lines from active quotations. 


 For each shipment line, Purchasing displays the following information: Quotation
number, Supplier, Item Number, Item Description, Quotation Line, Unit Price,
Freight Terms, Payment Terms, and Discount.

In the Shipment Approvals region, Purchasing displays all existing approvals for
the current line. You can delete any of the existing approvals, or you can add
approvals for the current line as described in the following steps.

2. Enter the approval Type. Approval types determine the types of documents on
which you can use the approved shipment. The available types are: All Orders (all
types of purchase orders and requisitions), Purchase Agreements, Requisitions,
Standard Purchase Orders.

3. Enter an active approval reason.

4. Enter comments about your approval.

5. Enter the name of the Approver.

6. Enter the Effective date range for your approval.


Purchasing - Quotations


@  Quotations

Quotations

Prerequisites:

• Define suppliers and supplier sites.
• Define supplier lists.
• Define locations.
• Define buyers.
• Define unit of measure classes
• Define units of measure.
• Define payment terms.

To enter quotation header information:

1. Navigate to the Quotations window by selecting Quotations from the menu. Purchasing displays the functional Currency from your ledger.


2. Select the Operating Unit for the quotation.

3. Enter a unique number for the quotation.

4. In the Type field, enter one of the document names defined for quotations.

5. If you copied this quotation from an existing RFQ, Purchasing displays the
corresponding RFQ number, which you can override. You can also manually provide an RFQ number.

6. Enter the Supplier for this quotation.

7. Enter the supplier Site for this quotation.

8. Enter a supplier Contact for this quotation.

9. Enter the Ship-To and Bill-To locations for the items on the quotation.

10. Use the Status field to control the status of the quotation:
In Process
Active
Closed

11. Enter the Supplier Quote number.

12. Select Approval Required to indicate that approval is required to purchase goods
based on this quotation.

13. The Response Date is the date you actually received the quotation.

14. Enter the beginning and ending Effective Dates for the quotation.

To approve the quotation:
Select the Approve button to open the Approve Entire Quotation window.

To enter currency information:
Select the Currency button to open the Currency window.

To enter terms and conditions information:
Select the Terms button to open the Quotation Terms window.

To enter shipment information:
When the Quotation Class of the header Type is Bid, you can select the Shipments
button to open the Quotation Shipments window.

To enter price break information:
When the Quotation Class of the header Type is Catalog, you can select the Price
Breaks button to open the Price Breaks window.

To enter a quotation line:

1. Select the Items tabbed region in the Quotations window.

2. Enter a unique Number for the quotation line.

3. Enter the line Type for the item.

4. Enter the Item for your quotation line. Purchasing retrieves the item description,
purchasing category, and unit of measure.

5. Enter the Revision number for the item on the requisition line.

6. Enter the UOM for your quotation line.

7. Enter the unit Price for the quotation line. 


Purchasing - RFQ


@  RFQ’s

RFQ

Each RFQ consists of header, line, and shipment information. You can send the RFQ to
as many suppliers you want and decide how much item information to provide to the
suppliers. There are two methods of creating an RFQ; manual entry and by copying a blanket
purchase agreement. Manual entry is described in this section below and the copy
blanket agrement to RFQ process is described in detail in the Purchase Orders section.

Prerequisites:

• Define suppliers and supplier sites.
• Define supplier lists.
• Define locations.
• Define buyers.
• Define unit of measure classes.
• Define units of measure.
• Define payment terms.

To enter RFQ header information:

1. Navigate to the RFQs window. Purchasing displays today's date as the Created date
and the functional Currency from your ledger.


2. Select the Operating Unit for this RFQ.


3. Enter a unique number for the RFQ.

4. In the Type field, enter one of the document names defined for RFQs. The list of
values lists the Document Type (Document Name) and Quotation Class from the
Document Types window.

5. Enter the Ship-To and Bill-To locations for the items on the RFQ.

6. Use the Status field to control the status of the RFQ:
In Process - The initial status when you create the RFQ.
Active - Choose this status when the RFQ is complete and you are ready to send
it to your suppliers. Only Active RFQs are printed.
Printed - The status assigned to the RFQ when you have printed at least one
copy of it. You must change the status to Active if you want to reprint the RFQ.
Closed - Choose this status to close the RFQ when all suppliers have responded
or when you no longer want responses. When you close an RFQ, Purchasing
deletes all follow up notifications associated with it.

7. Enter the Due Date when you want your suppliers to reply.

8. Enter the Reply/Receive via code for the method you want the supplier to use to
send the quotation.

9. Enter the Close Date for the RFQ.

10. Purchasing displays your name as the Buyer.

To enter supplier information:
Select the Suppliers button to open the RFQ Suppliers window.

To enter currency information:
Select the Currency button to open the Currency window.

To enter terms and conditions information:
Select the Terms button to open the RFQ Terms window.

To enter shipment information:
When the Quotation Class of the header Type is Bid, you can select the Shipments
button to open the RFQ Shipments window.

To enter price break information:
When the Quotation Class of the header Type is Catalog, you can select the Price
Break button to open the Price Breaks window.

To enter an RFQ line:

1.        Select the Items tabbed region in the RFQs window. 


2. Enter a unique Number for the RFQ line.

3. Enter the line Type for the item. When you enter a line type, Purchasing
automatically copies the corresponding purchasing category, unit, and unit price.

4. Enter the Item for your RFQ line. Purchasing retrieves the item description, purchasing category, and unit of measure.

5. Enter the Revision number for the item on the requisition line.

6. Enter the UOM for your RFQ line.

7. Enter an optional Target Price for the RFQ line. You may want to provide a target
price on the RFQ line for negotiation purposes.


Purchasing - Suppliers


Purchasing - Suppliers

Entering Suppliers Manually

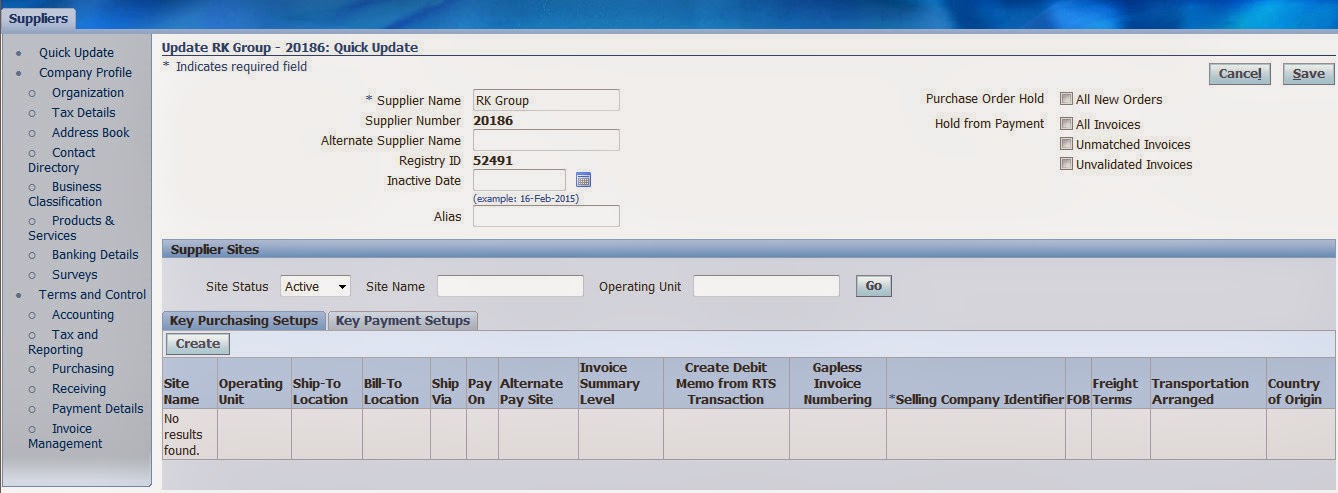
You can create supplier records manually using the Create Supplier page.

Purchasing Prerequisites

• If you use Oracle Purchasing, define Supplier Types in the Oracle Payables Lookups window.
• If you use Oracle Purchasing, define Ship via codes in the Defining Freight Carriers window.
• If you use Oracle Purchasing, define FOB codes, Minority Groups and Freight Terms codes in the Oracle Purchasing Lookups window.

To enter basic supplier information:

1. From the main Suppliers page, click the Create Supplier button.

2. In the Create Suppliers page, enter a unique Supplier Name.

3. If the Supplier Number Entry option in the Payables System Setup window is set to Automatic, Payables automatically enters a Supplier Number for you. If this option is set to Manual, you must enter a unique Supplier Number.

4. Optionally enter Alias, Name Pronunciation, and D-U-N-S number.

5. Optionally enter the supplier's tax identification number in the Taxpayer ID field.

6. Optionally enter the value-added tax (VAT) registration number in the Tax Registration Number field if you are entering a VAT supplier.

7. Click Apply. The system creates the supplier record and accesses the Suppliers: Quick Update page.

 8. If you want to prevent invoice or purchase order entry for this supplier after a certain date, access the Suppliers: Organization page and then enter the date in the Inactive Date field.

9. To create locations for the supplier, go to the Suppliers: Address Book page and click the Create button.

10. Enter supplier and site information in the appropriate Supplier pages. See the following page reference sections for detailed information. 


• Quick Update.
• Organization.
• Tax Details.
• Address Book.
• Contact Directory.
• Business Classification.
• Products and Services.
• Banking Details.
• Surveys.
• Accounting.
• Tax and Reporting.
• Purchasing.
• Receiving.
• Payment Details.
• Relationship
• Invoice Management.

The information for each supplier record is organized into two main sections:

Company Profile: These pages contain all of the personal information about the supplier, their identity and their type of business. A significant portion of this information needs to be elicited directly from your contacts at the supplier.

Terms and Controls: These pages provide access to all of the attributes that are used to control the business relationship you have with the supplier. This includes account code references, internal tax setups, purchasing, receiving, invoicing, and payment options. In addition, there is a Quick Update page that can be personalized to provide access to the most commonly used setup attributes for individual users or groups of users.

The Suppliers pages consist of:

• Quick Update.
• Company Profile.
• Organization.
• Tax Details.
• Address Book.
• Contact Directory.
• Business Classification.
• Products and Services.
• Banking Details.
• Surveys.
• Terms and Controls.
• Accounting.
• Tax and Reporting.
• Purchasing.
• Receiving.
• Payment Details.
• Relationship
• Invoice Management.

Information is shown for supplier and all sites on the same page. In the Site region, you can filter the display to show either Active or Inactive site records, or use the search tools to look for sites that have names that contain a specific text string or are in operating units that contain a specific text string. Most site-level details are available on each main profile page, but for some parts of the supplier profile, the site-level attributes are accessed in a drill-down page.

Purchasing - Workflow


Workflow Options


Purchasing provides default functionality in its Oracle Workflow-automated processes.
This default functionality is described in the sections below. If you do not want this
default functionality, you can change it in the Oracle Workflow Builder. Before you can use or modify any of the workflows in Purchasing, you need to set up Oracle Workflow if you haven't done so already.

Oracle Purchasing integrates with Oracle Workflow technology to create standard
purchase orders or blanket releases automatically from approved requisition lines. The
workflow for creating purchasing documents automatically is called PO Create
Documents. PO Create Documents includes important attributes which you should
evaluate and consider changing in the Oracle Workflow Builder.

Starting the Send Notifications for Purchasing Documents Process:

The workflow process, Send Notifications for Purchasing Documents, looks for
documents that are incomplete, rejected, or in need of reapproval and sends
notifications to the appropriate people of the document's status. For these notifications
to be sent, you need to start the concurrent program process Send Notifications for
Purchasing Documents if you haven't done so already as part of your standard setup.

The Workflow Background Engine must be running if you are using the following options:

• The Background mode for Purchasing approvals. By default the profile option PO:
Workflow Processing Mode is set to Background. You must start the Workflow Background Engine in order for the Background mode to work.

• The Timeout feature in any workflow. The Timeout feature sends reminder
notifications.

• The Background mode for the item attribute Send PO Autocreation to Background
in the PO Requisition Approval workflow.

• The Confirm Receipts Workflow Select Orders process. This is a process you submit
through the Submit Request window. If you submit it, the Workflow Background
Engine must also be running.

If you want to use the Workflow Background Engine for both requisitions and purchase
orders, you need to submit it twice, once for PO Approval and once for PO Requisition
Approval. Or, by not specifying an item type, you can submit it for all item types.


Purchasing - Defining Line Types

Line Types

When you enter a line on a purchasing document and choose a line type, Purchasing
automatically displays the default information that you define here for the line type.
Line types let you distinguish their value basis between quantity and amount based line
items. You use quantity based line items when you know the quantity and price of the
line you are ordering.

Prerequisites

• Define categories.
• Define units of measure.

To define line types

         1.        Navigate to the Line Types window.


2. If you are defining a new line type click Create. 

3. Enter the Name and Description of the line type.

4. Enter the Value Basis for the line type.
Amount: Receive items by amount. You cannot change the unit of measure and unit
price on purchasing document lines.
Fixed Price: If Oracle Services Procurement is implemented, enter services by
amount only. Receive items by amount. You cannot change the unit of measure and
unit price on purchasing document lines.
Quantity: Receive items by quantity. Outside Processing line types must have this
value basis.
Rate: If Oracle Services Procurement is implemented, enter services by rate (price)
and amount. Receive items by amount.

5. Enter the Purchase Basis for the line type.
Goods: For quantity value based line types.
Services: For amount and fixed price based line types.
Temp Labor: If Oracle Services Procurement is implemented, for fixed price and rate
based line types.

6. Enter the End Date on which the line type is no longer usable.

7. Enter the default purchasing Category for items with this line type.

8. Select Receipt Required if you want this as the default on your purchasing document shipments with this line type.

9. Enter the default Unit of measure for items with this line type. 

10. Enter the default Unit Price for items with this line type. 

11. Save to Defining Line Types.

Purchasing - Receiving Options


Receiving Options

Use the Receiving Options window to define options that govern receipts in your
system. Most of the options that you set here can be overridden for specific suppliers,
items, and purchase orders.

To define receiving options:

       1.        Navigate to the Receiving Options window.


 2. Select your Inventory Organization.

 3. Enter the Enforce Ship To location option to determine whether the receiving
location must be the same as the ship-to location. Choose one of the following
options:
None - The receiving location may differ from the ship-to location.
Reject - Purchasing does not permit receipts when the receiving location differs from
the ship-to location.
Warning - Purchasing displays a warning message but permits receipts when the
receiving location differs from the ship-to location.

4. Choose an action for ASN Control. This field determines how Purchasing handles
receiving against purchase order shipments for which an Advance Shipment Notice
(ASN) exists. Choose one of the following options.
None - Purchasing does not prevent or warn you when you try to receive against a
purchase order shipment for which an ASN exists.
Reject - Purchasing gives you a message and prevents you from receiving against a
purchase order shipment for which an ASN exists.
Warning - Purchasing gives you a message informing you that an ASN exists for the
purchase order shipment and lets you decide whether to receive against the
purchase order shipment or its ASN.

5. Enter the maximum acceptable number of Days Early and Days Late for receipts.

6. Enter an action for Receipt Days Exceed-Action. This field determines how
Purchasing handles receipts that are earlier or later than the allowed number of
days selected above. Choose one of the following options:
None - Receipts may exceed the allowed days early or late.
Reject - Purchasing does not permit receipts outside the selected number of days
early or late.
Warning - Purchasing displays a warning message but permits receipts outside the
selected number of days early or late.

7. Enter the maximum acceptable Over Receipt Tolerance percentage.

8. Enter the Action for Over Receipt Action. This field determines how Purchasing
handles receipts that exceed the quantity received tolerance. Choose one of the
following options:
None - Receipts may exceed the selected tolerance.
Reject - Purchasing does not permit receipts that exceed the selected tolerance.
Warning - Purchasing displays a warning message but permits receipts that exceed
the selected tolerance.

9. Enter the default RMA Receipt Routing that you assign goods: Direct Delivery,
Standard Receipt, or Inspection Required.

10. Enter the default Receipt Routing that you assign goods: Direct Delivery, Standard
Receipt, or Inspection Required.

11. Check Allow Substitute Receipts if you want to receive substitute items in place of
ordered items. You must define substitute items in the Item Relationships window
before you can receive them.  

12. Check Allow Unordered Receipts if you want to receive unordered items. You can
later match the unordered receipts to a purchase order. If you enable this option,
you can override it for specific suppliers and items.

13. Check Allow Express Transactions to enable express deliveries and receipts.

14. Check Allow Cascade Transactions to enable cascading for receipts and receiving
transactions.

 15. Select Allow Blind Receiving if you want blind receiving at your site. Blind
receiving helps you ensure that receivers record the exact amount they receive.
With blind receiving, you cannot see the quantity due or the quantity ordered for
shipments when you receive items. Purchasing ignores all quantity receipt
tolerances to help ensure that you can receive the exact amount the supplier
shipped.

16. Select Validate Serial Numbers on RMA Receipts if you want serial numbers
validated. Restricts serial numbers displayed in the list of serial numbers for an
RMA line.

17. Choose the Receipt Number Generation method for receipt numbers
Automatic: Purchasing automatically assigns a unique sequential number to each
receipt when you create the receipt.
Manual: You provide a receipt number manually when you enter the receipt.
Purchasing numbers receipts within inventory organizations rather than across
inventory organizations. So, for example, the same receipt number could be used by
different inventory organizations.

18. Choose the Receipt Number Type you want Purchasing to use for receipt numbers:
Numeric or Alphanumeric.

19. Enter the Next Receipt Number. This is the starting value you want Purchasing to
use for generating unique sequential receipt numbers if you choose Automatic
receipt number entry. Purchasing displays the next receipt number that will be used
for a new receipt when you create the new receipt. You cannot enter this field if you
choose Manual receipt number entry.

Accounting

20. Enter the accounting flexfield for the default Receiving Inventory Account.

21. Enter the account number for the Retroactive Price Adjustment Account. This is the
account that receiving will use to post an adjusting entry for changes in pricing after
a shipment has been received and accrued.

22. Enter the account number for the Clearing Account. This is the account that is used
for inter-company receivables in the procuring organization when the receiving
organization is not the same as the procuring organization.

Cost Factors

23. If you have implemented Oracle Advanced Pricing to calculate cost factors, check
Interface to Advanced Pricing.

24. If you have implemented Oracle Transportation Execution to calculate
transportation costs, check Interface to Transportation Execution.

25. Save to define receiving options.


Topics Covered

Purchasing Concurrent program INVENTORY MODULE Inventory Concepts Min-Max Puchasing Sales Order Supply Chain Management Xml Publisher dff Alert Creation Assembly Pull Assigning Approval Groups Assigning Item BOM Tables Backend Tables Base Tables Bills of Material Tables CATALOG TABLES CATEGORY TABLES Closed not Summarized Concurrent Programs Concurrent Request Consigned and VM Inventory Count (*) Customer Items Customer Items Architecture DDL DML Defining Line Type Defining Subinventories Drop Ship EBS EVEN NUMBERED Error: - APP-PER-50022 FND Tables FRM-40735 Fetch Item Information Flexfields Functional GENERIC DISPOSITIONS Hosting ITEM LOCATIONS TABLE Idle Session Timeout Important questions Introduction to Database Invalid Identifier Error Inventory Inventory Implementation Inventory Item master Inventory Transaction Item Attributes Item Cross Reference Item Defining Attributes Item Deletion Item Master Item Relationships Item Status Attributes Item Tables Java Setup for R12 Key Tables Location Creation Lot and Serial Manufacturer Items Move order Normalization ODD NUMBERED ORA-29273 ORDER MANAGEMENT Oracle Apps Oracle Instance Oracle Order Management PURCHASING MODULE Payable Table Payment Terms Procure to Pay Cycle Profile Categories Purchase - PO Revisions Purchase - Purchase Document Types Purchase Order Purchasing - Define Buyers Purchasing - Defining Approval Groups Purchasing - Invoice matching Purchasing Options Quotations Quote Analysis RFQ RICE Components Receipt Routings Receivables (AR) Tables Receiving Options Registration of a Report Requisition Templates Responsibility Query SALES ORDER TABLE SALES PERSON CREATION SCM Service Contract Sql Self Joins Subinventory Subinventory Transfer Supplier Lists Suppliers TEMP Tablespace Toad Value Sets Wildcard Workflow copy column find an PO details implementation inbound order to cash org_id out bound out of the box implementation vanilla implementation